> ## Documentation Index
> Fetch the complete documentation index at: https://www.latitude.sh/docs/llms.txt
> Use this file to discover all available pages before exploring further.
# Deploying a server
You can deploy a bare metal server via the dashboard or [API](https://www.latitude.sh/docs/api-reference/create-server). Latitude.sh takes care of provisioning, OS installation, and configuration based on the settings you choose.
Once deployment is complete, you'll receive your access credentials.
 [metal.new](https://metal.new) takes you straight to the server deployment page.
Follow these steps to deploy a server from the dashboard:
[Sign in](https://www.latitude.sh/dashboard) to your Latitude.sh account, navigate to **Bare metal** > **Servers** in the sidebar, then click **Create server**.
Select a server based on your workload and location needs. If the configuration you need isn't available, the page may show **Join waitlist** or **Ask custom build**. Choose **Join waitlist** to get notified when stock is available, or **Ask custom build** to request a custom server setup. You can also [contact the team](https://www.latitude.sh/contact) directly.
Select the Operating System. If the OS you're looking for isn't offered, you can use a [custom image](/servers/custom-images) instead.
SSH and User data are not available for some operating systems. You can list
all operating systems and their supported features using the
[/plans/operating\_systems
endpoint](https://www.latitude.sh/docs/api-reference/get-plans-operating-system).
Add SSH keys if desired. Password authentication is enabled by default and **disabled** when you deploy with an SSH key. This means the dashboard won't show the password to you after deployment. Learn more about creating and adding your SSH keys [here](/servers/ssh-keys).
Latitude.sh does not provide a root password when you select one or more SSH keys.
Optionally, select or create a **User Data script**. User data scripts run automatically on the server's first boot through the [cloud-init](https://cloud-init.io/) process. See the [Server Configuration section](/servers/user-data) for more details.
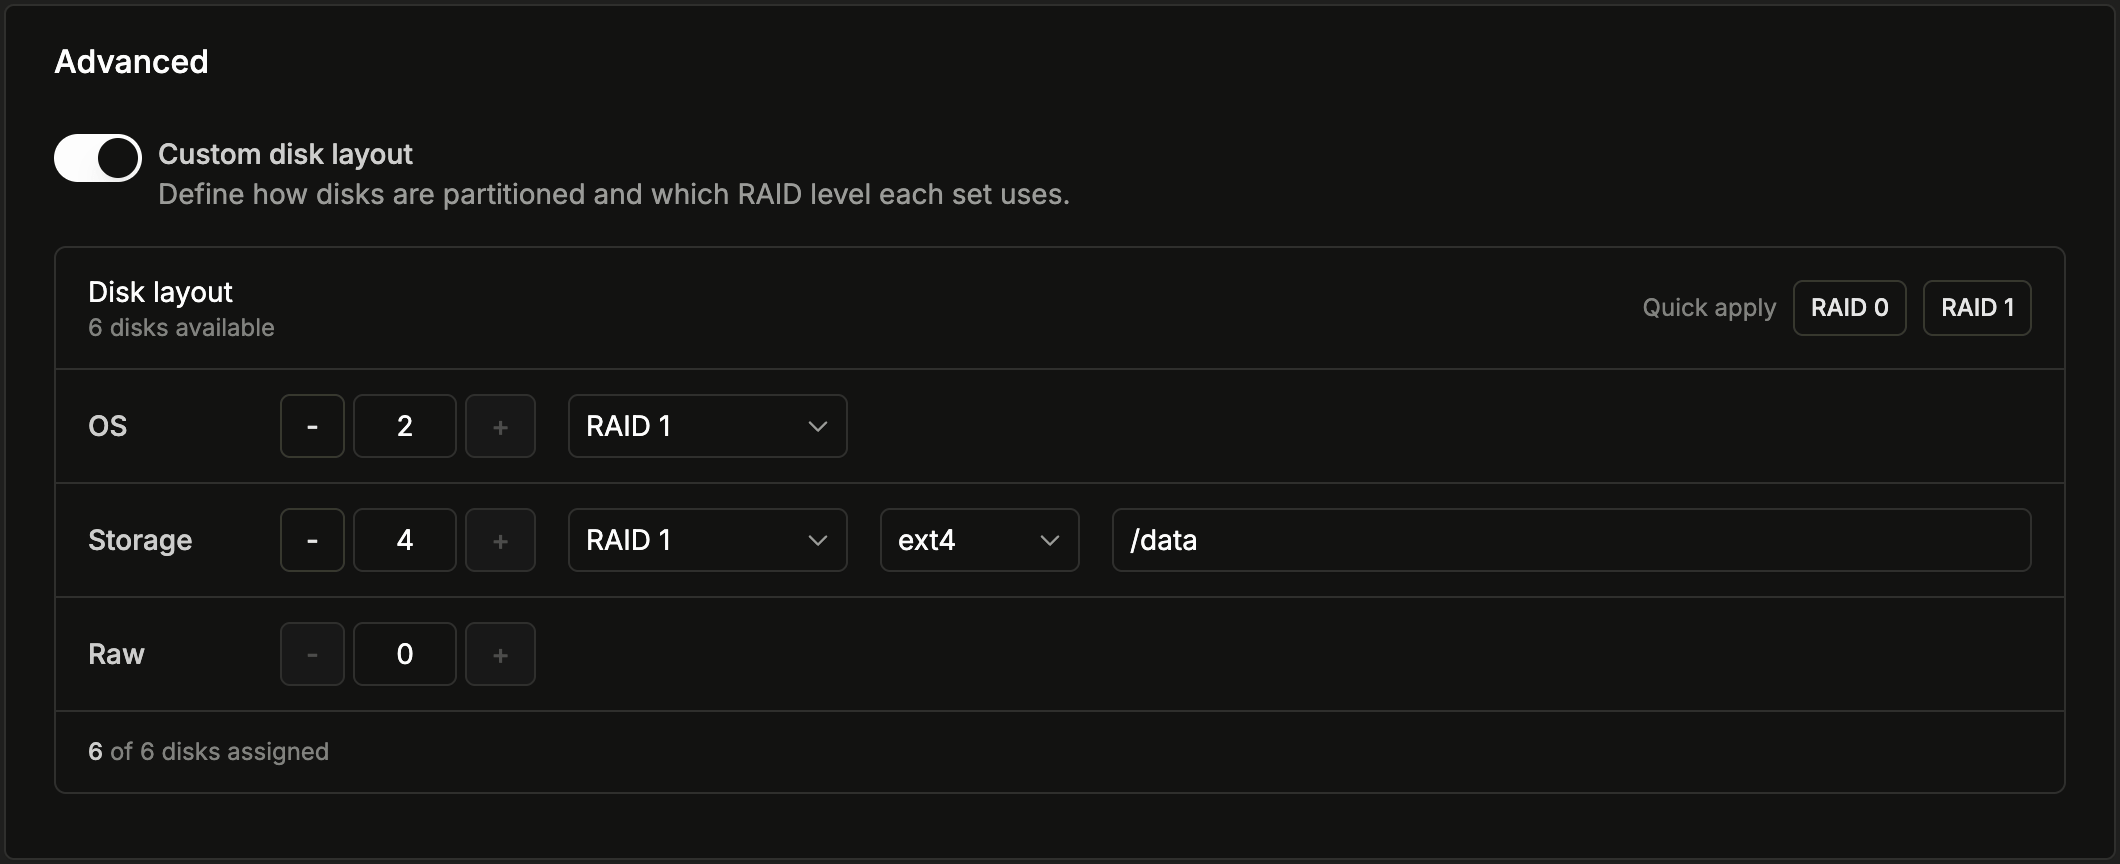
Optionally, open the **Advanced** section to configure RAID or a **custom disk layout**. This is available when your server has at least two disks and you select a compatible operating system. Enable **Custom disk layout** to control how disks are grouped into OS, storage, and raw volumes — including the RAID level, filesystem, and mount point of each — or use **Quick apply** to set a simple RAID level. Use the [/plans](https://www.latitude.sh/docs/api-reference/get-plans) endpoint to check compatibility. Learn more about [custom disk layout](/servers/custom-disk-layout).
[metal.new](https://metal.new) takes you straight to the server deployment page.
Follow these steps to deploy a server from the dashboard:
[Sign in](https://www.latitude.sh/dashboard) to your Latitude.sh account, navigate to **Bare metal** > **Servers** in the sidebar, then click **Create server**.
Select a server based on your workload and location needs. If the configuration you need isn't available, the page may show **Join waitlist** or **Ask custom build**. Choose **Join waitlist** to get notified when stock is available, or **Ask custom build** to request a custom server setup. You can also [contact the team](https://www.latitude.sh/contact) directly.
Select the Operating System. If the OS you're looking for isn't offered, you can use a [custom image](/servers/custom-images) instead.
SSH and User data are not available for some operating systems. You can list
all operating systems and their supported features using the
[/plans/operating\_systems
endpoint](https://www.latitude.sh/docs/api-reference/get-plans-operating-system).
Add SSH keys if desired. Password authentication is enabled by default and **disabled** when you deploy with an SSH key. This means the dashboard won't show the password to you after deployment. Learn more about creating and adding your SSH keys [here](/servers/ssh-keys).
Latitude.sh does not provide a root password when you select one or more SSH keys.
Optionally, select or create a **User Data script**. User data scripts run automatically on the server's first boot through the [cloud-init](https://cloud-init.io/) process. See the [Server Configuration section](/servers/user-data) for more details.
Optionally, open the **Advanced** section to configure RAID or a **custom disk layout**. This is available when your server has at least two disks and you select a compatible operating system. Enable **Custom disk layout** to control how disks are grouped into OS, storage, and raw volumes — including the RAID level, filesystem, and mount point of each — or use **Quick apply** to set a simple RAID level. Use the [/plans](https://www.latitude.sh/docs/api-reference/get-plans) endpoint to check compatibility. Learn more about [custom disk layout](/servers/custom-disk-layout).
 Select the Billing Type. For **On Demand billing**, choose between hourly and monthly when deploying an instance. See the [Billing section](/billing/on-demand-vs-reserved) for more information.
Choose the number of servers to deploy. Select up to **5 servers** to deploy at once using the quantity selector.
Click **Deploy** to start the provisioning process.
Select the Billing Type. For **On Demand billing**, choose between hourly and monthly when deploying an instance. See the [Billing section](/billing/on-demand-vs-reserved) for more information.
Choose the number of servers to deploy. Select up to **5 servers** to deploy at once using the quantity selector.
Click **Deploy** to start the provisioning process.