> ## Documentation Index
> Fetch the complete documentation index at: https://www.latitude.sh/docs/llms.txt
> Use this file to discover all available pages before exploring further.
# Custom disk layout
> Control how your server's disks are grouped, formatted, and mounted using RAID levels and custom disk layouts.
If you have complex redundancy or performance requirements, you can control how your server's disks are grouped, formatted, and mounted with a **custom disk layout**.
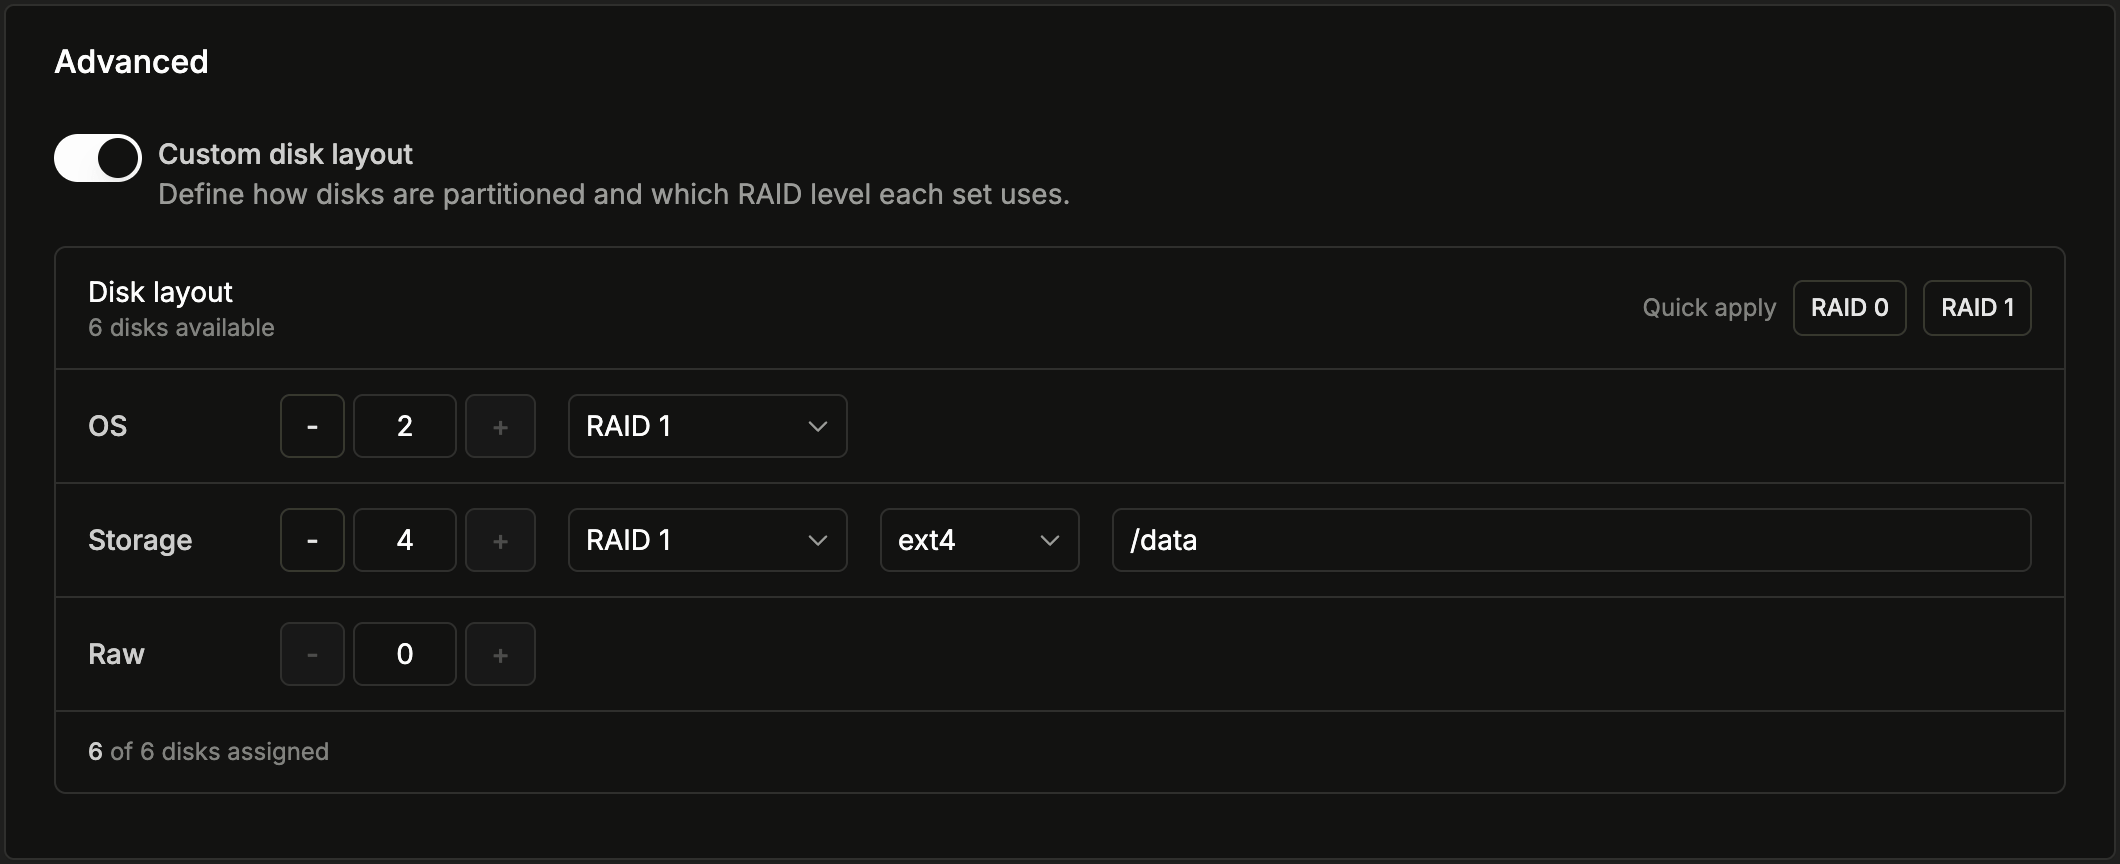
When you deploy or reinstall a server, enable **Custom disk layout** in the **Advanced** section to define exactly how disks are grouped and which RAID level each group uses. This page explains how the custom disk layout editor works and the supported RAID levels.
 ## Availability
Custom disk layouts require a server with **at least two disks** and an operating system that supports software RAID. They are not available for iPXE installs or [instant deployments](/docs/servers/instant-deployment). Use the [/plans](https://www.latitude.sh/docs/api-reference/get-plans) endpoint to check compatibility.
| | RAID 0 | RAID 1 |
| :-------------------------- | :------------------------------------------------------------------------------------------ | ----------------------------------------------------------------------------------------- |
| Disks required | 2+ | 2+ |
| Operating Systems supported | - Ubuntu 16.04 LTS or newer
## Availability
Custom disk layouts require a server with **at least two disks** and an operating system that supports software RAID. They are not available for iPXE installs or [instant deployments](/docs/servers/instant-deployment). Use the [/plans](https://www.latitude.sh/docs/api-reference/get-plans) endpoint to check compatibility.
| | RAID 0 | RAID 1 |
| :-------------------------- | :------------------------------------------------------------------------------------------ | ----------------------------------------------------------------------------------------- |
| Disks required | 2+ | 2+ |
| Operating Systems supported | - Ubuntu 16.04 LTS or newer
- CentOS 7.4 or newer
- RedHat Enterprise Linux 8.4 | - Ubuntu 16.04 LTS or newer
- CentOS 7.4 or newer
- RedHat Enterprise Linux 8.4 |
| RAID Type | Software | Software |
| What it does | Combines two or more disks by striping data across them. [Read more](#raid-0) | Mirrors data between two or more disks. [Read more](#raid-1) |
## Custom disk layout
Enable **Custom disk layout** to split your server's disks into up to three groups, each with its own role:
| Group | Purpose | What you can set |
| :---------- | :--------------------------------------------------------------------------------- | :--------------------------------------- |
| **OS** | The boot and root volume where the operating system is installed. | Number of disks, RAID level |
| **Storage** | An additional data volume, formatted and mounted at a path you choose. | Number of disks, RAID level, mount point |
| **Raw** | Unformatted disks left untouched for you to partition yourself after provisioning. | Number of disks |
* Each group's **RAID level** can be **No RAID**, **RAID 0**, or **RAID 1**. RAID 0 and RAID 1 require at least two disks within that group.
* The **Storage** group is formatted with the filesystem `ext4` and mounted at the **mount point** you choose, which defaults to `/data`.
* Use **Quick apply** to fill the entire layout with a sensible default at a single RAID level (see [Default configuration](#default-configuration)).
You can also configure the disk layout through the API by passing a `disk_layout` array to the [create server](https://www.latitude.sh/docs/api-reference/create-server) and reinstall endpoints. Each entry sets a `role` (`os`, `storage`, or `raw`), a disk `count`, and — where applicable — a `raid_level` and `mount_point`.
For infrastructure-as-code workflows, the [Latitude.sh Terraform provider](https://registry.terraform.io/providers/latitudesh/latitudesh/latest/docs) supports custom disk layouts through the `disk_layout` attribute on a `latitudesh_server` resource. Each disk group accepts the same fields as the API — a `role`, a disk `count`, and, where applicable, a `raid_level` and `mount_point`. The `disk_layout` attribute is mutually exclusive with the simpler `raid` attribute, and changing it triggers a reinstall, so the server must allow reinstalls. See the [provider documentation](https://registry.terraform.io/providers/latitudesh/latitudesh/latest/docs/resources/server) for the full attribute schema.
## Default configuration
When you apply a simple RAID level — either with **Quick apply** in the custom disk layout editor, or by deploying without customizing the layout — disks are grouped automatically based on how many the server has:
| **# of disks** | **No RAID** | **RAID-1** | **RAID-0** |
| :------------- | :--------------------------------------------------- | :-------------------------------------------------------------- | :-------------------------------------------------------------- |
| **1** | No raid | No raid | No raid |
| **2** | No raid | RAID-1 on the two disks | RAID-0 on the two disks |
| **3** | No raid | RAID-1 on the three disks | RAID-0 on the three disks |
| **4 or More** | RAID-1 on smaller disks, no raid on the larger disks | RAID-1 on the two smaller disks, and RAID-1 on the larger disks | RAID-1 on the two smaller disks, and RAID-0 on the larger disks |
You can fine-tune any of these defaults in the [custom disk layout](#custom-disk-layout) editor before deploying or reinstalling.
## RAID levels explained
The RAID level is what determines the relationship of the disks. There are numerous RAID levels but only the ones supported by Latitude.sh are explained here.
## RAID 0
RAID 0 combines two or more disks by striping data across them, which means that chunks of data are written to each disk in the array alternately. This gives you a great performance improvement as the data is distributed between disks and each one can be utilized for both reads and writes.
This approach offers great performance as you get the performance of a single disk multiplied by the number of disks in the array and also get the combined capacity of all drives, but there is one important drawback that needs to be considered.
As data is being split up and divided between the disks in the array if one of the disks fails the entire array and all data is lost because the failure of a disk will remove the chunks that were written to it from the array, leaving the other disks with incomplete (as in corrupted) data. RAID 0 arrays cannot be rebuilt as there will be no knowledge by the other devices of the data that needs to be reconstructed.
If you decide to run a RAID 0 array, backups are extremely important, as your entire data set depends equally on the reliability of each of the disks in the array.
## RAID 1
RAID 1 is a configuration that mirrors data between two or more disks. Everything written to the array is placed on each of the devices in the group, so each disk has a complete set of the available data.
This means that you have redundancy in case of device failure. In a RAID 1 array, data is accessible as long as a single disk in the array is functioning properly. The array can be rebuilt by replacing failed drives, at which point the remaining disks will be used to copy the data back to the new device.
In RAID 1 it's especially important that all disks in the array are performing well, as the performance of write operations will be that of the slowest device in the array. This happens because the whole piece of data must be written to each of the disks in the array.
It's also important to note that, as all of the data lives in each disk, the total capacity of the array will be that of the smallest disk. Adding new disks increases the number of redundant copies of the data, but doesn't increase the amount of available capacity.
For read operations, the theoretical performance is the same as with RAID 0 where you multiply the read speed of a single disk by the number of disks.