> ## Documentation Index
> Fetch the complete documentation index at: https://www.latitude.sh/docs/llms.txt
> Use this file to discover all available pages before exploring further.
# Set up a private cloud on bare metal with Harvester
> Learn how to build a scalable private cloud on Latitude.sh from setup to deployment
Building a private cloud on bare metal gives you both flexibility and control. It provides cloud-like agility with the dedicated performance of physical servers. This keeps you in charge of your infrastructure, avoiding the limitations of public cloud providers.
In this guide, we'll walk you through setting up your own private cloud on the [Latitude.sh platform](https://www.latitude.sh/dashboard) using [Harvester](https://harvesterhci.io/), an open-source hyper-converged infrastructure (HCI) solution. Harvester simplifies managing virtual machines and [Kubernetes clusters](/guides/kubernetes-on-bare-metal) on your servers, giving you a unified system that supports cloud-native workloads from the core to the edge. So let's jump right in!
## Requirements
* 1 [Latitude.sh](https://www.latitude.sh/) server (3 recommended for high availability, but not required)
* [Harvester iPXE script](https://github.com/latitudesh/examples/blob/main/custom-images-v2/harvester/boot.ipxe) for cluster setup
* IP address range to assign to your VMs (at least 1 /29 block for both cluster and VM, or 2 /29 blocks to separate traffic between them)
## Step 1: Prepare the iPXE script
Go to [the Latitude.sh repository](https://github.com/latitudesh/examples/blob/main/custom-images-v2/harvester/boot.ipxe), or copy the script below to automatically install Harvester on your server:
```shell theme={null}
#!ipxe
dhcp
kernel https://releases.rancher.com/harvester/master/harvester-master-vmlinuz-amd64 ip=dhcp net.ifnames=1 \
root=live:https://releases.rancher.com/harvester/master/harvester-master-rootfs-amd64.squashfs \
console=tty1 console=ttyS1,115200n8 \
harvester.install.skipchecks=true \
harvester.install.tty=tty1
initrd https://releases.rancher.com/harvester/master/harvester-master-initrd-amd64
boot
```
In the `boot.ipxe` script, you must replace `HARVESTER-CONFIG-FILE` with the URL of your customized Harvester configuration file.
For the first node, configure the HARVESTER-CONFIG-FILE.yaml shown below, replacing the placeholders with your environment details.
```yaml theme={null}
scheme_version: 1
token: {{CLUSTER-TOKEN}}
os:
hostname: {{HOSTNAME}} # Set a hostname. This can be omitted if DHCP server offers hostnames.
ssh_authorized_keys:
- {{SSH_PUBLIC_KEY}}
password: {{ENCRYPTED_PASSWORD}}
ntp_servers:
- 0.suse.pool.ntp.org
- 1.suse.pool.ntp.org
dns_nameservers:
- 8.8.8.8
- 1.1.1.1
install:
mode: create
management_interface:
interfaces:
- name: {{INTERFACE_NAME}}
default_route: true
method: static
bond_options:
miimon: 100
ip: {{PUBLIC_IP}}
subnet_mask: {{PUBLIC_SUBNET}}
gateway: {{PUBLIC_GW}}
device: {{BLOCK-STORAGE-DEVICE}}
iso_url: https://releases.rancher.com/harvester/master/harvester-master-amd64.iso
tty: ttyS1,115200n8 # For machines without a VGA console
vip: {{VIRTUAL-IP-FOR-CLUSTER-MANAGEMENT}}
vip_mode: static # Or static
vip_hw_addr: # Leave empty when vip_mode is static
```
To replace the placeholders in the HARVESTER-CONFIG-FILE.yaml, follow these steps:
1. **CLUSTER-TOKEN**: This is a unique token used to create the cluster and join new nodes. You can generate a random string (e.g., openssl rand -hex 16) or create a meaningful token.
2. **HOSTNAME**: Replace this with the hostname of your server. This can be anything meaningful to you, like node1, harvester-master, etc.
3. **SSH\_PUBLIC\_KEY**: Enter your public SSH key here. This allows you to log in to the server via SSH after installation. You can find your public key by running `cat ~/.ssh/id_rsa.pub` on your local machine.
4. **ENCRYPTED\_PASSWORD**: Replace this with an encrypted password (hashed with bcrypt, for example). You can generate this using a password generator or encryption tool like [openssl](https://github.com/openssl/openssl).
5. **INTERFACE\_NAME**: Set this to your network interface name (e.g., eth0, enp1s0, etc.). You can find this by running `ip a` or `ifconfig` on your server to identify the network interface name.
6. **PUBLIC\_IP**: This should be the static public IP address assigned to the server. It's the IP you want to use for the management interface.
7. **PUBLIC\_SUBNET**: Replace this with the subnet mask of the network your server is in.
8. **PUBLIC\_GW**: This is the gateway IP address for your network, typically the IP address of your router.
9. **BLOCK-STORAGE-DEVICE**: Specify the storage device where Harvester should be installed. This is typically something like `/dev/sda` or `/dev/nvme0n1`, depending on your server's disk layout.
10. **VIRTUAL-IP-FOR-CLUSTER-MANAGEMENT**: This is the virtual IP (VIP) that will be used for cluster management. It must be an unused IP in the same subnet as your public IP and dedicated for cluster management.
## Step 2: Request additional IPs
Depending on the number of VMs and services you plan to deploy, calculate the required IP addresses. If you're running out of available IPs, you may need to request additional IPs.
Go to **Networking > IP Addresses** on the [Latitude.sh dashboard](https://www.latitude.sh/dashboard) to request additional IPs:
* Select the required number of IPs. **Request at least 1 /29 block for both cluster and VM, or 2 /29 blocks to separate traffic between them.**
* Provide a justification for the request (e.g., setting up a Harvester-based private cloud)
Once you've received additional IP addresses, assign them to your VMs in Harvester.
## Step 3: Boot the server
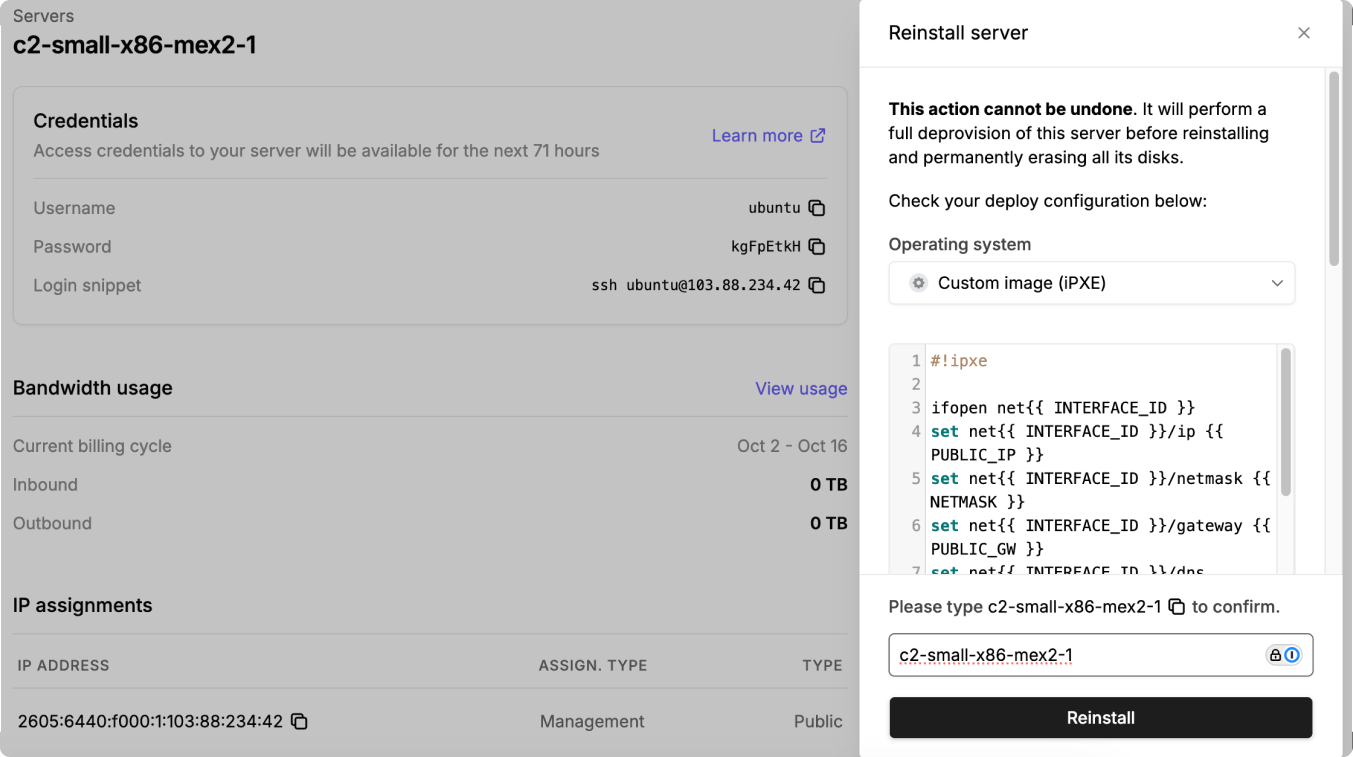
In the [Latitude.sh dashboard](https://www.latitude.sh/dashboard), click **Reinstall** from the server Actions menu, choose **Custom image (iPXE)** as the OS, and paste your modified **boot.ipxe script** with the URL of your customized Harvester configuration file.
This will automatically install Harvester on the server and configure it as the management node for your cluster.
 For additional nodes, boot each node using the corresponding iPXE script and the HARVESTER-ADD-NODE-TO-CLUSTER.yaml configuration to join the existing cluster.
## All set!
With your Harvester cluster deployed, you now have full control over your cloud-native workloads and the flexibility to scale as your needs evolve. This setup ensures high-performance virtualization while maintaining the manageability of cloud environments.
For additional nodes, boot each node using the corresponding iPXE script and the HARVESTER-ADD-NODE-TO-CLUSTER.yaml configuration to join the existing cluster.
## All set!
With your Harvester cluster deployed, you now have full control over your cloud-native workloads and the flexibility to scale as your needs evolve. This setup ensures high-performance virtualization while maintaining the manageability of cloud environments.